1968 Triumph TR250

Featured

   Boy, what a mess this one is in.  I’ve been thinking about restoring / working on a TR250 for some time – In my mind is a great combination of the TR6 and TR4.  I really like the classic Italian design of the TR4 but with the added grunt of an inline 6 engine.  The problem is, of course, that TR250s can be quite expensive when fully restored and I didn’t want to spend much money on purchasing a project.  The following car was posted up on Ebay but it did not sell.  The owner and I got together several weeks later so I could take a close look at the wreck, a deal was struck and I ended up loading the car into the back of a moving truck.  The vehicle has been sitting in a storage locker since the beginning of summer of ’07 and I’ve now started to get the itch to start working on it.  I will again document this rebuild in the usual way, I’d love to hear comments so if you desire, drop me a line. 

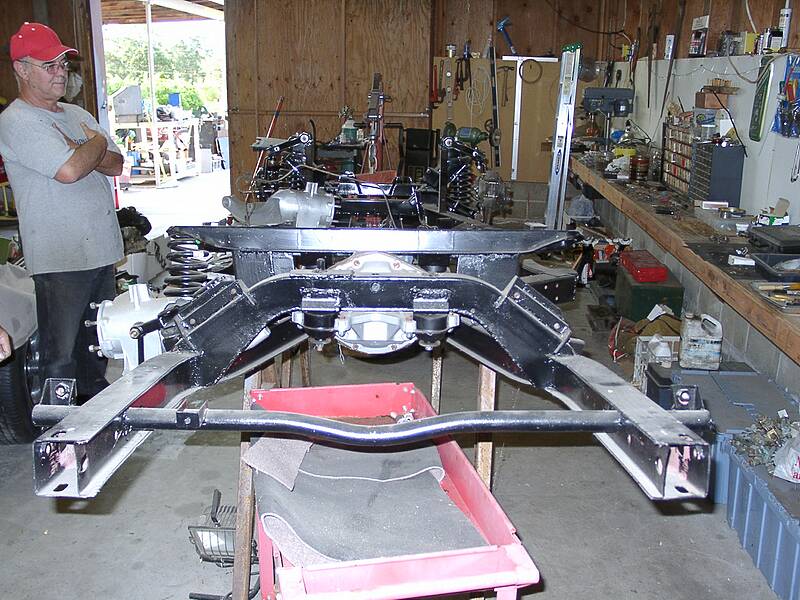
As you will tell from the following photographs, this car will need a complete going through – the body will have to be completely rebuilt including sheet metal work.  All of the mechanicals will need to be done, engine, transmission, rear end, everything.  The guy I bought the car from had started to restore the vehicle – The chassis is probably 50% built but it’s been sitting so long that a lot of the rubber has perished and I just feel that I should start from scratch.  So, I’ll take the chassis all the way to the ground, get it blasted and then check everything.  Finally, all the pieces will be powder coated before reassembly.  I’ve got plans to install Herman Van Den Akker’s Toyota supra transmission kit.  This car originally came equipped with an A-type overdrive transmission but I just don’t want to deal with it.  I also plan on installing GoodParts rear CV axles & the nissan LSD rear differential which GoodParts also offer an installation kit for.  I hope to make this car a real nice reliable drive – I’m going to keep all the original parts so any future owner can of course go back to stock if they really desire.

Here are pictures of myself and my friend Pat down in Southern Oregon loading the car into our rented moving truck – and then subsequently unloading it at the local Public Storage.

Subaru Differential Installation – Write Up 3/22/04

It’s true – I can’t leave well enough alone.  I’m starting to tinker with the idea of installing the 3.9l Rover V8 I have in my garage in this car.  There is no way the stock drive train will take that much power without modifications so I’ve decided to ditch the triumph parts and go with something more modern and maintainable.  The first step in redoing the rear end is to replace the stock differential with a newer unit.  I came across a website in New Zealand with a guy who had installed a Subaru / Datsun 510 rear diff into his car without modifying the frame.  After talking to him at length I decided to copy his route.  I wanted to install the differential without making any changes to the frame whatsoever.  This meant that Mike and I had to modify the differential to get it too fit.  We fabricated an adapter plate that converted the front four differential mounting bolts into the two triumph mounting bolts:

We also machined a replacement rear differential cover plate which allowed the differential to bolt right up into the spitfire frame the same way the triumph differential did.  Finally, we welded onto the differential a mounting plate for the leaf spring.  Although I want to end up with coil over shocks, to initially test this unit – I want to keep the stock swing-spring setup.

Three axle adapter plates were machined.  Two for the output shafts and one for the input shaft.   These plates converted the Datsun / Subaru bolt pattern to the triumph bolt pattern.  The output shaft adapter plates also made the width of the differential the same as the triumph unit so the stock half axles would bolt right on.  Installation of the unit took a few hours.

Power Clutch – Geo Metro Brake Booster – Write up 3/22/04

Back in Week 33 ( a couple of years ago) I talked about having to change the clutch hydraulics to support the new Howe throw out bearing.  What I ended up with was a Tilton 1″ Master cylinder bolted to the firewall which directly operated the slave cylinder.   Although this worked, clutch pedal effort was extremely hard and I noticed that the bulkhead was actually flexing as I was operating the clutch.  Because the firewall is just sheet steel, I knew it wouldn’t be long before I started to get metal fatigue and serious problems would then start happening.  I started to think of ways to decrease the pedal effort but keep the hydraulic arrangement that I currently had.  I decided to try a remote pedal arrangement.  I had the 3/4″ Tilton master cylinder left over from tinkering with the Howe bearing.  I figured I could use this cylinder on the bulkhead.  If I got a 3/4″ slave cylinder, I have the beginnings of a remote pedal.  The easiest way I thought of to decrease pedal effort was to use some form of power brake booster.  I needed something small that I could fit on the battery tray.  I looked around and noticed that the Geo Metro brake booster would probably work.  I had machined two aluminum plates – one plate to bolt at the back of the booster to hold the 3/4 slave cylinder.  The front plate would adapt the bolt pattern of the geo booster to the Tilton 1″ master cylinder.   The way the system works now is that the 3/4″ Master and Slave cylinders give me a remote pedal mount.  The slave cylinder directly operates the 1″ master cylinder through the brake booster which gives me the assistance I need (and greatly reduced pedal effort).  There are two separate hydraulic systems for the clutch now but operating the clutch when the engine is running is now nice and light with no bulkhead flex.

Pictures of the booster and brackets: