
This week I completed building the rear axles and started on the stearing rack. I took the gaters off the rack and cleaned all the grease off the rack to inspect the mechanicals. The motion is very rough, there is a problem somewhere. bugger…
Author Archives: admin


Week 19: (Feb 7th 1999)
This week I cleaned all the gunk of the differential and started to rebuild the axles


Week 18: (January 31st 1999)
Well, I actually managed to get some work done with the rear end this weekend. The rear axles were returned from napa with the trunnions pressed off the axle. I now was able to take the front and rear bearings out. The main front bearings are shot and will need to be replaced.
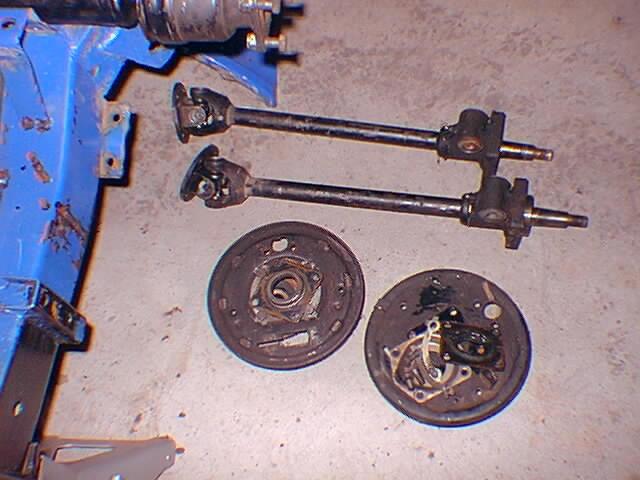
I also repainted the axles, brake plates, sway bar, and also put the sway bar back together with new bushings:
Photos (before painting):


After Painting:


Here are the bearings all cleaned up:

Week 17: (January 24th 1999)
I had to work this weekend so I didn’t’ get anything done. Have to have an entry though.
Week 16: (January 16th 1999)
Well, This week I have started to dismantle the rear axles. Attached are some e-mails that I have sent and received regarding the rear axles. I had several issues while working on the axles. My initial goals for this week were:
Dismantle
clean
repaint
rebuild with new seals, gaskets, brake shoes, & dust covers
Ahh.. Well, First of all, I needed to use the “original factory tool” to remove the axle flange from the trunion set. This turned out to be easy because there was a guy that lives 15mins from my home that has one of these tools. If you can’t get the factory tool then you will have to use some form of press with sufficient support for the flange. Bend the flange and you’re done.
My next issue was the removing of the outer wheel bearing. Here is the email I sent out:
OK, I’m taking apart the rear axles and I have run into a problem.
Somebody out there must know this:
Ok, I have removed the axle hub.
Now, according to the directions, I push the inner hub down the axle shaft
to expose the outer bearing so I can remove it. Here is my problem, the
axle is machined so that the inner hub can only go down the shaft a certain
distance. With the inner hub pushed down the shaft as far as it will go, I
can not get to the far side of the bearing to remove it. Wassup??
question:
What is the proper way to dismantle the rear axle so I can replace all of
the oil seals and check the bearings??
thanks.
This is the response:
Huw,
I just finished disassembling the rear axle assemblies on my 70 spit. I
completely removed whole rear axle assembly from the vehicle so I could work on
a bench. After removing the Drum, brakes, and of course the hub flange, I
removed the 4 bolts which hold the brake back plate to the trunnion. I removed
the grease shield, and grease seal. Now using my 2 jaw gear puller, I pushed
the axle shaft out of the trunnion which now holds the bearings and seals, Then
using a wooden dowel, I tapped the main bearing out of the trunnion. It’s a bit
over the top, but I am working on reconditioning the entire rear axle assembly.
It is also much easier to work on a bench top than down along side the car.
Good Luck. Let us know how it turns out.
I am going to take the axles to napa to have them press them out.
Photos:
Week 15: (January 9th 1999)
I had to work this weekend so I didnt’ get anything done. Have to have an entry though.
Week 14: (January 2nd 1999)
Well, after spending about three months taking the car apart, I am almost done. This week I finished up taking all the little things apart to clean and paint. This included taking the door glass hardware out of the doors, taking out the windscreen and the top chrome finisher, and removing the headlight assemblies from the hood. To protect the windscreen, I thought it best to install it in my other ’78 spitfire (didn’t come with one). Ahh, you ask, where did this other spitfire come from? Well, I bought it about two months ago for 500 dollars. Included a ton of brand new never used parts so I think it was a steal. There is not much more I can do to the body for a little while, or at least until things get a little warmer. I can’t paint when it’s 40 degrees in the shop. During the next month or so, I’ll rebuild the stearing rack, the rear brakes, replace the u-joints, etc. Stay tuned! It’ll get exciting.
Of course, here are the photos for the week:
Door with all the hardware removed:

The windscreen removed from the spitfire:

Week 13: (December 26th 1998)
I removed the back end of the car this week:
Left wheel / axle
Right wheel / axle
Main drive shaft
Rear Differential
Leaf Spring
Brake hoses
Fuel Lines
Brake lines
Here are the photos:


Week 12: (December 19th 1998)
Didn’t really do anything this week, to busy with work. I removed the fuel tank from the back end of the spitfire.

Week 11: (December 12th 1998)
It is almost time to sandblast this car to clean all of the old paint off. In order to do this, I need to remove everything from this car (clips, steering column, gas tank, brake lines, hoses, heater, glass). Joe Curry and I also had some discussions this weekend about the overdrive transmission chassis mounting plate. Unfortunately, the 4-spd transmission plate is not useable for the overdrive. David Gates provided an excellent template for creating a new transmission chassis plate that I will fabricate for the installation:

Photos of the car this week:
Here is the front of the car with the heater and steering column removed:

Here is the trunk removed (but the gas tank is still installed, it’s full of gas, bummer)

While cleaning the car, Joe Curry and I noticed some stress fractures in the car. Here is a crack by the front left drivers side seat bolt. This will need to be repaired hopefully with a welder when the car is sand blasted.

Here is another fracture in the engine compartment (by the tranmission tunnel opening). This will also have to be fixed.
